
Tutorials


Check out this tutorial: The ultimate guide to retouching eyes in Photoshop
Get in-the-know!
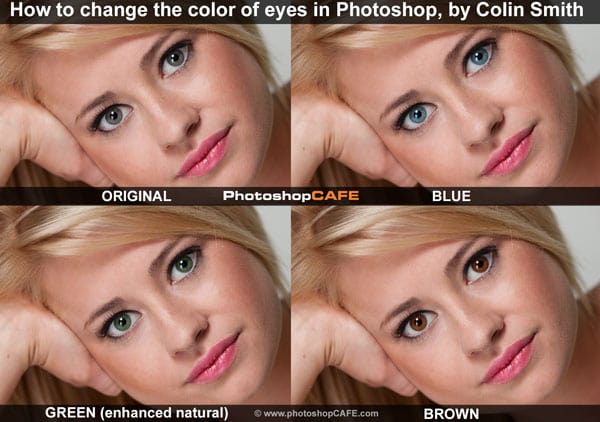
How To Change The Color Of Eyes In Photoshop
I’m very excited to bring you my latest Photoshop tutorial. In this tut, I’m going to show you the best way, to change the color of someones eyes. You can use this technique on people, or even animals. I’m going to start simple and add complexity (and realism – you know I LOVE realism!).
I’m going to do some basic color changes at first, then I’m going to show you how to also change the tones and even make vampire eyes if you want to go crazy. The method I’m going to teach you won’t just look good, it’s also efficient and completely non-destructive. Here at the MAFIA WORLD, we don’t just care about killer results, we also care about best practices. Also, I’m using Photoshop CC, but this can be accomplished on any version of Photoshop that supports adjustment layers, (Added in CS4).
Ok, enough horn tooting, lets get started.
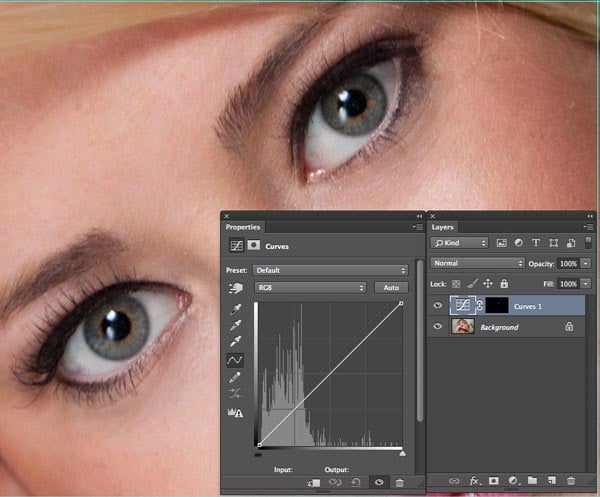
Step 1
Isolating the adjustment with Layer Masks
This is the image I’m going to start with. It’s a photo that I shot of Callen in my LA studio. Shot with a 5DmkII and used kinoflo lights for lighting. Open an image of your own that contains eyes.
Step 2
The first thing we need to do is set everything up so that only the eyes will change when we adjust the colors. We will be using an adjustment layer (curves and a layer mask. All adjustment layers come with masks, the mask will isolate the adjustment. Let’s go…
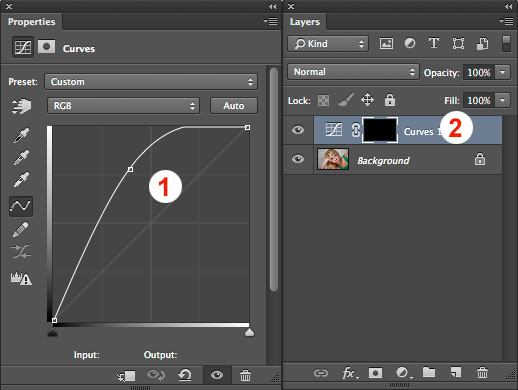
Click on the little icon in the Layers panel that opens adjustment layers (in the middle bottom of the panel, The button that looks like a half filled circle). A pop up will open when you click the button. Choose Curves.
You will see that adjustment in the Layers Panel, it will say Curves 1. There are 2 parts, the adjustment (the grid with an S-looking thing) and a white rectangle. Click the curve icon thing to change adjustment layer settings (curves) click the rectangle to work with the masks.
Step 3
Open the Properties panel if you are on CC, the Adjustments panel if on earlier versions.
(Double clicking the curves icon will do the trick too).
(Double clicking the curves icon will do the trick too).
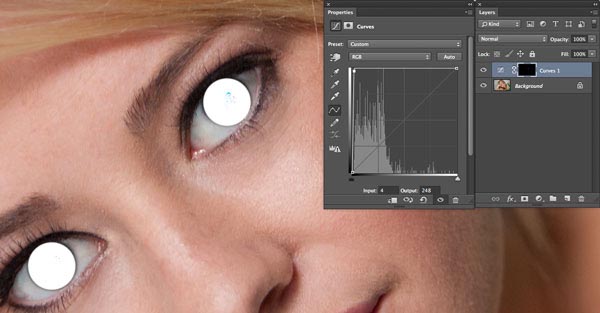
Grab the curve (1) and drag it diagonally all the way to the top left. We are only making a radical adjustment temporarily, so we can what we are doing as we are working.
Click on the mask (2) Press Cmd/Ctrl+I to invert the mask. The curves adjustment should be hidden now.
Step 4
We only want the adjustment to appear in the eyes. Make sure that the mask is active. We are going to paint with white, this will allow the adjustment to show though. (and also isolate it to just the eyes).
Choose a round brush. Set the hardness to 100%. Adjust the size, to the same size as the eyes. (press the [ or ] keys to adjust the size of the brush)
Click in the eye on the photograph to paint that part of the mask. In this case, it shows pure white because I have adjusted the curve all the way to the the top left. (If yours doesn’t show pure white, it doesn’t matter. It’s just an indicator so we can see where the mask in painted.)
Step 4b
Change the brush color to black.
Paint out the areas of the eyes that overlap the eyelids, so only the eye shape is painted.
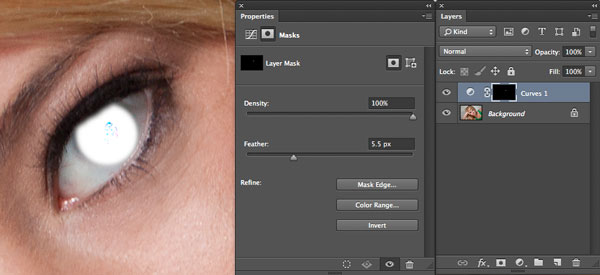
Double click the mask to open the Masks in the Properties panel (Mask panel in CS4-CS6)
Adjust the feather slider to make the edge of the mask soft.
(In earlier versions than CS4, choose Filter>Blur>Gaussian Blur to do the same thing)
Step 5
Click the reset button in the curves panel (looks like a circular arrow at the bottom of the panel)
We have now set the masks up. Everything is set up so that only the eyes will be affected when we make changes, (don’t you love masks) We have also reset the curves to default, so that there is no changes to the image right now.
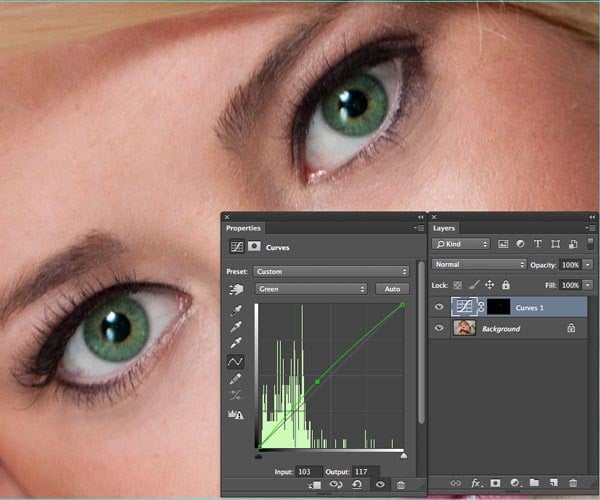
Step 6
Here is where we start to have some fun.
We are going to use the color channels in curves to make our color changes. This is by far the best way to make these types of changes in Photoshop.
(Using a brush with color mode, doesn’t really cut it, because you can’t control tones and it will also change the secondary colors = fake)
In the curves panel, click in the dropdown at the top that says RGB. Choose Green
Click on the diagonal line and GENTLY move the curve up. A little goes a long way. Notice, we are able to change the eye color to green. Notice that the eye also retains it’s secondary colors, so it looks real. (If you started with a different color eye and it doesn’t quite look right yet, stick with me, keep going)
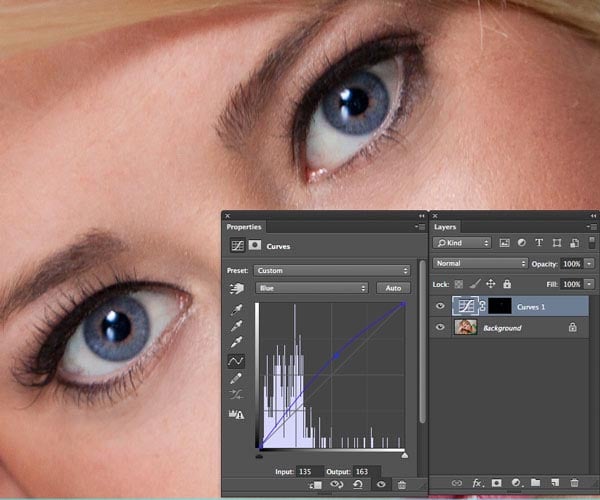
Step 7
Let’s try a different color, (Use a new adjustment layer, or reset the curve)
To change the color to blue, choose the blue channel and move it up until it looks right to you.
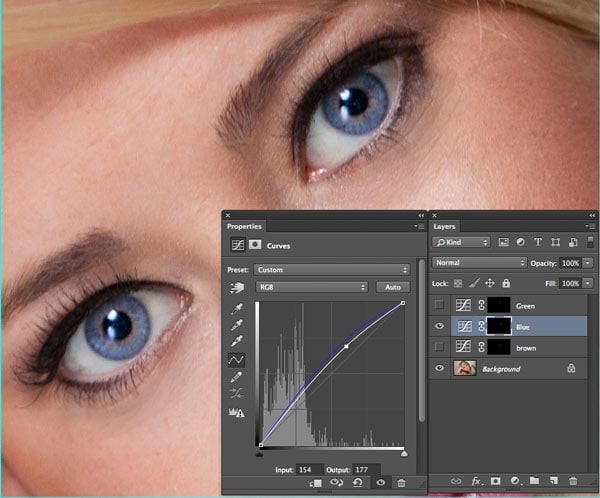
Step 8
You can also make changes to the composite channel. This adjusts the darkness or lightness. The whaa channel? You already used it. On the dropdown, choose the RGB.
Lets look at adjusting the tone curve on the blue color It’s the missing element to get the exact eye color we want. Drag the curve down to darken and get that nice deep blue like Liv Tyler’s eyes.
Step 9
You can also drag the curve up to brighten the eyes. In this case we have a more common lighter blue.
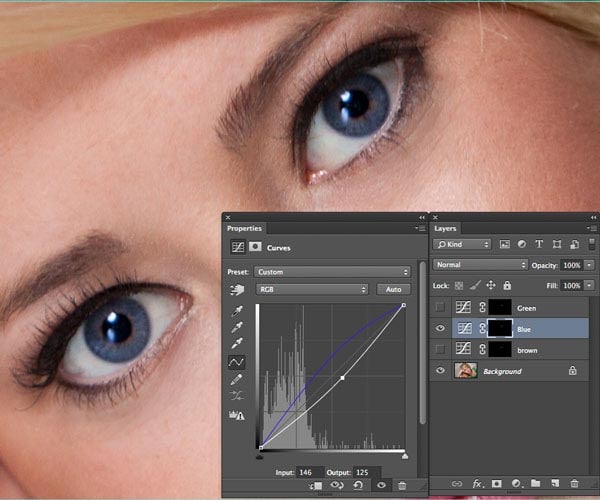
Step 10
Adjusting multiple channels
We went to make the eye look brown. There is no brown channel! What to do?
We can make adjustment s to more than one channel (in fact it’s often best to adjust more than one channel to dial in the exact color that you want)
In this case, I increased the red and dropped the blue. It’s looking better, but still not right, let’s do another thing.
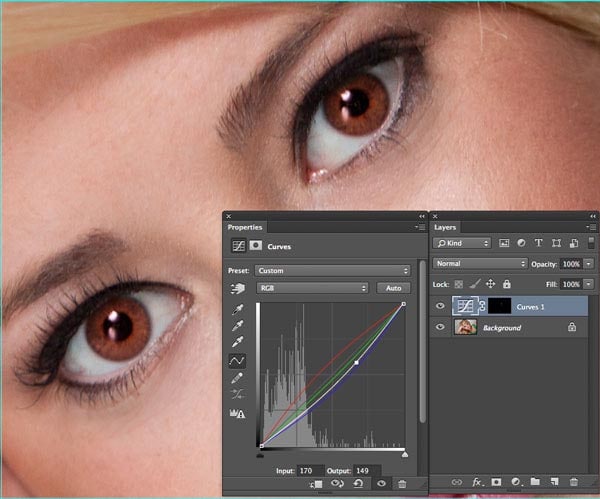
Step 11
On the dropdown, choose the RGB
In this case I made it darker by dragging the curve down. (Better, but still not perfect for brown, stick with me, we will get there)
(I also have a tutorial here for you to watch for a curves primer if you need it)
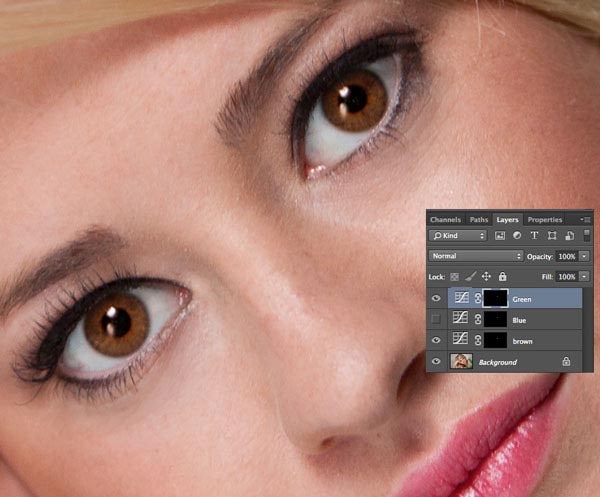
Step 12
Ok, I did promise you, realistic brown eyes didn’t I.
You can stack more than one curve layer together, I combined the half-assed brown from earlier on with the Green adjustment and bingo, now we have a nice Natalie Portman deep brown.
End
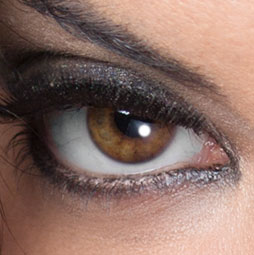
Now my hope is that you are soaking this up and grabbing the idea. The same principles I have just shown you will enable you to turn any eye color into any color you want. To prove it, I have turned Callen’s eyes into freshly fed vampires eyes.
conclusion
I hope you have enjoyed this tutorial. Check out the other free tuts here at MAFIA WORLD. I’m updating all the old ones and adding new ones all the time.
Happy photoshopping and leave a comment !
Get in-the-know!


0 comments: